Generating Contour Meshes from Images
You can generate contour meshes that describe the contour around values in a dataset that are above the selected lower threshold. The created surface, in the resolution of the dataset voxel sizes, can also be re-sampled to a specified density. In the example below, a contour mesh was generated from a volumetric scan of a titanium implant in rabbit bone.
Contour mesh (on right) of a titanium implant in bone

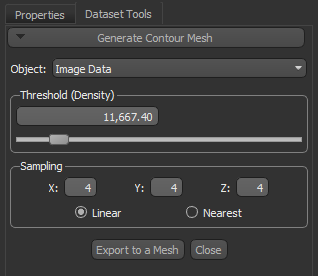
The settings for generating contour meshes are available in the Generate Contour Mesh dialog, shown below. Right-click the required volumetric dataset in the Data Properties and Settings panel to access the panel.
Generate Contour Mesh panel
|
|
Description |
|---|---|
|
Object |
Indicates the currently selected object. If required, you can select another object in the drop-down menu to generate additional contour meshes. |
|
Threshold |
Determines the threshold value that will be used to generate the contour mesh.
|
|
Sampling |
Determines the sampling rate that will be applied along each axis and the sampling algorithm. At a setting of 4, one of every four pixels will be sampled. Modifying the values for an axis or axes will generate a mesh representing more or less vertices. Each voxel value is analyzed when the sampling value is set at 1. You can also select a sampling algorithm — Linear or Nearest. Linear… Selecting Linear will result in a linear sampling algorithm being applied. Nearest… Selecting Nearest will result in a nearest-neighbor sampling algorithm being applied. |
- Right-click the required dataset in the Data Properties and Settings panel and then choose Generate Contour Mesh in the pop-up menu.
The Generate Contour Mesh panel appears on the Dataset Tools tab.
- Do one of the following:
- Enter a threshold value in the Threshold edit box.
- Select a threshold value with the slider.
- Select a sampling rate and algorithm, which determines how surfaces are tessellated or broken down logically into a series of small triangles or facets.
Each voxel value is analyzed when sampling value is set at 1. Setting the sampling rate at a higher value will produce results faster, but at a lower quality.
- Click the Export to a Mesh button.
The generated mesh is added to the Data Properties and Settings panel (see Mesh Properties and Settings for information about making a mesh visible in a scene and about the settings available in the lower section of the panel.
- Generate additional contour meshes, if required.
You can select different threshold values for the currently selected object, or choose to work with another object.
- Click the Close button to close the Generate Contour mesh panel.


